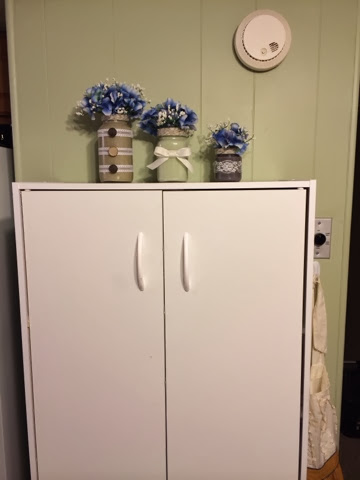
Painted Jars


Hope you enjoy making these as much as I did. This is probably the quickest craft project I have done in a long time. There are so many possibilities, with different paint colors, buttons, ribbons, or even real flowers… if you decide to do this, please send me a picture! I would love it.
Easy Crochet Infinity Scarf

I was visiting my family for the past couple weeks in California, and sadly my husband couldn't be with me because of work. I left him alone living like a bachelor in our little trailer, so when I returned home a few nights ago I knew it would probably be a spaghetti night due to lack of groceries. As I was about to throw away yet another spaghetti sauce jar I thought, what a waste of a perfectly good jar! There are actually a lot of things you could do with your empty glass jars, organize loose packets of oatmeal, sugars, tea, or put together the dry ingredients of your favorite cookies for a birthday gift, or paint them and stick some flowers in them for an easy decoration! Here are the jars I used, the picture shows a Prego Jar but I didn't think I would like the Prego logo that's imprinted on the top collar of the jar so I used a Ragu one instead. Then I grabbed a regular mason jar and an old Wyler's Chicken Broth Cubes jar I had saved under my sink. I really liked how these jars lined up perfectly.

Next, peel off any stickers and let them soak in warm soapy water for awhile. Make sure you get off all of the sticky glue used to hold on the labels. This is the worst part! ( ; I had to scrub pretty hard on my smallest jar so eventually I just gave up and decided that part would be towards the wall. Oh, and about the expiration date that's printed on the jar, it scrubs off easily. And because we will be painting the inside of the jars, yes you will want this off.
Now all you do is take your clean, dry jars and poor the colors of your choice in them, you really don't need too much paint but if you poor in a little extra it makes the paint spread a little faster when you close the lid and shake it. I just used some old paint we had from painting our bedroom and kitchen. After you shake your jars really well, put them upside down on a paper plate for a about 5 minutes or so.

Then flip them up right so the inside can dry faster.


Next, grab whatever you what to decorate with. I had some yarn, fake flowers from Walmart, lace ribbon, and I admit I am a bit of a button collector so I had quite a few to pick from.

It's time to get creative! This is the best part, but if this makes you nervous, just copy me! I would LOVE it!


Hope you enjoy making these as much as I did. This is probably the quickest craft project I have done in a long time. There are so many possibilities, with different paint colors, buttons, ribbons, or even real flowers… if you decide to do this, please send me a picture! I would love it.
Easy Crochet Infinity Scarf

My husband is always outside, and when I say always I really do mean ALWAYS. He works with wildlife and on his free time he's hunting, fishing, or horseback riding. Wintertime in Idaho is nothing to be taken lightly. So my hubby never leaves our home without his wool vest, wool hat, and often his button up wool collared shirt. Wool is the way to go when it comes to staying warm so when I saw a yarn sale at Michaels yesterday I couldn't help but snatch some up.
I know crocheting might sound a bit scary for those of you who haven't tried it before. Many people give up on crocheting before they even get started! Why?? It's because the hardest part is the beginning. So please, PLEASE, do yourself the favor and keep working at it, I promise it will only get easier.
I've made the PERFECT BEGINNER PROJECT. I know infinity scarfs have been done over and over again but I just love how warm and comfy these suckers are. If any of my friends ask me to teach them how to crochet, this is the project I run to. The big yarn makes it easy to see and the huge hook makes it simple as well.
So this time around I've decided to mix two colors together, but this can be done the same way with only one color. I am headed to Harry Potter Land pretty soon so I've been having a mini movie marathon with my mom. GO GO GRYFFINDOR! It's the only explanation as to why I subconsciously picked these colors.
Anyway, when crocheting with two colors the first thing you want to do it roll your skeins into balls, there is nothing worse than having a knot in your yarn when your only halfway done with a project. After that just grab the two ends of the yarn and get started! (Pattern Below) I've shown here two different brands of wool yarn. Wool-Ease, and Cozy Wool. Both work fine and the only difference is that Wool-Ease has a bit more yardage but again, you can do this project with just one skein you do not need two, adding another color and crocheting them together just adds a little thickness.


The picture above shows just how simple it is to add another color to your work, just keep crocheting like it's one strand of yarn.


Look how cute my little Dakota is! She loves wearing her infinity scarfs and I love making them for her. I just made this one with the left over yarn I had from my scarf, perfect! I hate have little scraps of yarn everywhere and this is the perfect thing to do with it. So below is the pattern I used and a list of the terms you should know in order to complete this project. There are so many YouTube videos on crocheting all you need to do is search for those key words below and you'll be making these is no time! Please let me know if you have any questions, thank you!
What You will Need/Need to know how to do
-one or two skeins of wool yarn) or any thick yarn you like)
- a size Q crochet hook
-Scissors
Know how to...
-Chain
-Half-Double Crochet
-Single Crochet
Infinity Scarf Pattern
- Chain about 65-70 times and connect to the beginning of your first chain
- Half-double crochet around the circle 3-4 times until it's as thick as you prefer
- Tie a knot and weave in your end! DONE
* For a little toddler size just I chained 35, connected to the first chain and then half-double crocheted once around followed by a single crochet once around.
No comments:
Post a Comment